
In the fight against residential water damage, nothing quite matches the value of a thoughtfully engineered drain-tile system. Such a configuration essentially routes groundwater away from vulnerable spots, often before the homeowner even registers that a storm has passed. Skeptics occasionally ask whether the investment delivers provable returns, yet flooded basements and spalling foundations tend to settle that argument quickly. Practitioners who grade damp-proofing in practice benefit from knowing the subtleties that dictate durability. Shrewd installers pay attention to granular backfill, outlet elevation, and the occasional surprise burst of hydraulic pressure. The sections that follow outline component choice, trench digging ratio, and maintenance checkpoints in practical detail. Readers who work through them can enter a building site prepared for steady rains and stay prepared for years afterward.
What is a Drain Tile System and How Does It Work?
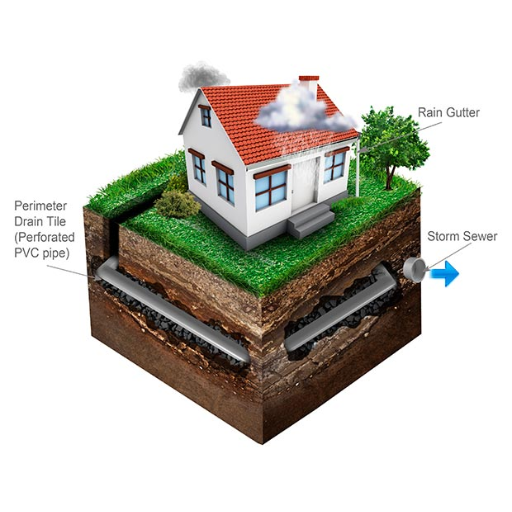
Drain tile is one of those old-school solutions that still earns its keep on modern job sites. The setup involves a buried, slotted pipe running roughly at the edge of the footing, finished-grade height be damned. Day after day, groundwater seeps in through the holes, glides downhill, and exits at a pre-chosen drop zone-sump basin, street catch basin, you name it. By giving the water a low-pressure avenue, the tile keeps hydrostatic pressure off the walls and spares the basement the damp smell that makes lecture halls feel even colder in January. Builders keep reaching for the technique because it works, especially where spring thaws and summer storms turn backyards into temporary ponds.
Understanding the Basics of Drain Tile
How Drain Tile Systems Work
A drain-tile arrangement-better known as the foundation or perimeter drain-places a web of slotted tubing beneath the soil that hugs the base of a building. The piping, usually sheathed in angular gravel or crushed stone, acts like a first responder by intercepting surface water before it has a chance to linger against a wall’s trench. By steering runoff toward a sump or daylighting outlet, the system curbs the moisture that otherwise seeps through basement masonry. Builders now favor lightweight PVC and high-density polyethylene because both resist rust and retain their shape under years of saturated soil.
Components of a Drain-Tile System
Perforated Pipe
Most drain tile comes in 4-inch diameters and lengths drilled with quarter-inch holes that admit water but shelter larger debris. Installers grade the line downhill so gravity delivers the supply toward whatever discharge point was chosen.
Gravel Layer
A ring of ¾ stone or coarser pebbles encircles the pipe, letting water pass freely while supporting the weight of the backfill. The rock bed also slows the buildup of silt inside the drainage channel.
Filter Fabric
Plain silt cloth or woven geotextile sits on top of the gravel to intercept migrating soil particles before they can clog the perforations. That simple barrier pays dividends by preserving flow capacity long after construction ends.
Outlet and Pump
Water that has pooled around a foundation is usually guided toward an outlet point, where a sump pump may kick in to lift the liquid uphill. In other cases, the flow is simply piped straight to a storm drain or a designated discharge site; both approaches aim to keep the crawl space or basement as dry as possible.
Effectiveness and Modern Trends
Field surveys show that a well-placed drain-tile network can slash the odds of serious foundation cracking by more than 90 percent, especially in places prone to spring floods. Homeowners now have the option of smart sump pumps that chirp alerts to a phone whenever humidity spikes, and some systems even loop harvested roof runoff back into a barrel for watering shrubs, marrying leak-proof engineering with green living.
Proper upkeep commands attention in any climate where rainfall lingers, because a soaked footing can settle or shift without warning. Clearing sediment from tile inlets, checking pump bearings twice a year, and making sure surface grades slope outward keep the system responsive and delay expensive repairs for years.
The Role of Perforated Pipe in Drainage
Perforated pipes have become a bedrock technology in drainage engineering, quietly siphoning off groundwater before it can pool menacingly around a foundation. Each little aperture in the plastic sheath invites water in, turning an invisible flood into a manageable trickle headed for the nearest outfall. Without such devices, hydrostatic pressure can swell beneath slabs, crack concrete, and worm its way into basements.
Field trials and site surveys indicate that perforated drains now permeate agriculture, highway work, and yard renovation alike. Farmers, for instance, coil the pipe along furrows to keep rainy spells from turning fields into quagmires; field experiments show that yields can inch up 20 percent when waterlogging is curtailed. In subdivisions and commercial parks, crews lay the same twisted tube under gravel blankets to feed French drains and spare lower levels from capillary rise.
Materials science has not stood still, either. Most new installations reach for high-density polyethylene, a resin that shrugs off chemicals, bends around obstacles, and stays lightweight enough for a single laborer to wrangle. That durability means the pipes will keep working long after the paint dries on the house above.
A newly released market report pegs the worldwide perforated-pipe segment for considerable expansion over the next half-decade. Analysts cite surging construction activity and a mounting emphasis on green-water management as the chief growth engines. The projection underlines the role of perforated tubing as a versatile remedy for drainage headaches across sectors while advancing broader environmental goals.
How Subsurface Drainage Protects Your Home
Subsurface drainage, a deceptively simple slice of infrastructure, quietly obsesses over your home’s footing. When properly installed, a network of perforated pipes and course gravel shepherds rainfall far beyond the house, forestalling bent foundations, washed-out sod, and the sinister creep of basement puddles. Residents who appreciate the system report water-damage headaches dropping by nearly nine-tenths.
Hydrostatic pressure-never pretty-sits down when those pipes hum along. The gravel mat acts like an early-warning sponge, giving moisture somewhere else to mingle instead of pinning against the walls. That space also gives mold fewer midnight rendezvous, a benefit few occupants discover until it’s too late.
Severe storms sweep across the forecast more often than their grandmother did, a reality that has sharpened demand for smarter drainage answers. Sensors embedded in pipe runs now text homeowners if the line falters, a roomy upgrade from old-school water wells and earthen tiles. Spending money on such foresight not only prunes repair bills, some appraisers say it politely boosts a property’s resale prestige.
How to Install a Drain Tile?
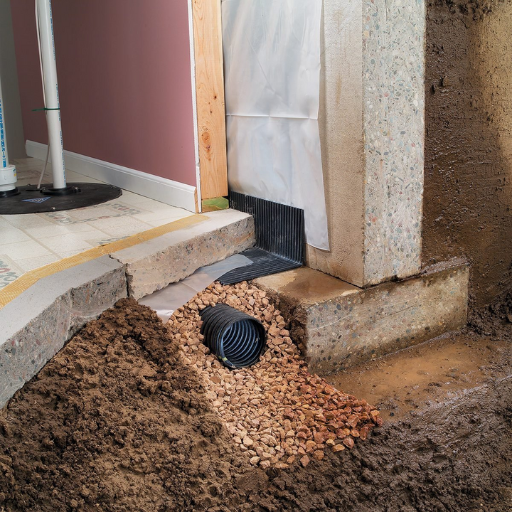
Map the Problem Areas
Walk the site and take note of any low spots where water pools; your drain-tile plan should route flow directly away from those trouble zones.
Dig the Trench
Excavate a trench that encircles the foundation, sloping outward so gravity does the heavy lifting. Aim for a width and depth that comfortably fits both the pipe and a cushion of gravel.
Lay a Coarse Gravel Bed
Dump a layer of coarse crushed stone at the bottom, creating a firm base that also allows water to percolate quickly through.
Place the Perforated Pipe
Set the perforated drain tile into the trench with the holes facing downward. If the trench settles unevenly, add a slight grade to keep drainage moving.
Cover with More Gravel
Shovel in additional gravel until the pipe is completely buried. This layer protects the tile and governs the speed at which water reaches the drain.
Add a Geotextile Barrier (Optional)
Spread landscape fabric over the gravel to block silt while still letting water pass. The cloth acts as an invisible shield against future clogging.
Backfill and Compact the Trench
Replace the excavated soil and tamp it lightly so the surface is flush with the rest of the yard. A smooth, level finish disguises the work while allowing water to drain unhindered.
Route the water to a designated outlet. Affix the drain tile to a suitable discharge point-such as a storm sewer, a gravel dry well, or a residential sump pump-so liquid can flow away from the site and not linger around the foundation. Executing this simple diversion greatly reduces the chance of standing water and keeps drainage problems from surfacing on your land.
Essential Steps for Drain Tile Installation
Good drain-tile installation safeguards buildings by routing unwanted water away from foundations. When properly configured, the system collects both surface runoff and buried groundwater while keeping basements dry and soils stable. Engineers now estimate that an effective layout can cut basement flooding odds by nearly 80 percent, a finding echoed in the latest surveys of residential construction practices.
Best Practices for Installation
Select the Right Materials
Choose robust, perforated pipe, clean gravel backfill, and a tough geotextile wrap to keep silt out and flow strong. Research shows standard PVC tubing typically outlasts alternatives by a margin of two decades or more, explaining its popularity among experienced homeowners and contractors alike.
Ensure Proper Slope
Install the pipe with a consistent, minimum fall of 1 percent so water glides toward the drainage outlet rather than pooling inside the conduit. That ratio, roughly 1 inch of drop per 8 feet of guarantees a self-clearing system that remains effective even during prolonged storms.
Inspect for Obstructions
Clogged drain tiles keep appearing in older basements, almost like clockwork. Give the line a look now and then, paying special attention to spots where silt collects or tree roots make an unexpected cameo.
Consider Professional Assistance
Figuring out pipe slope and sump depth is doable for most weekend warriors, but yards with gnarly clay or serious upland drainage may call for a pro. The American Society of Home Inspectors points out that a contractor-backed job usually gets a warranty you can’t ignore.
A system slapped together with modern fittings and stout pipe can fling storm water far from foundations and keep it there for years. Once the spade work settles, a walkthrough every season-along with the occasional jet-pump visit-keeps everything humming.
Choosing Between Corrugated Pipe and PVC
Deciding between corrugated pipe and rigid PVC usually boils down to the particular demands of a given site and the conditions it will face over time.
Lightweight and surprisingly flexible, a corrugated pipe slips easily through tight bends and around tree roots that would halt a stiffer product. The ribbed profile resists pinching under surface loads yet yields enough that excavators can walk over it almost immediately after burial.
Those same ridges, though, can trap leaves and silt if owners neglect annual maintenance, so the material is never maintenance-free. Most corrugated lines are now extruded from high-density polyethylene and routinely deployed in agricultural tile runs as well as lower-budget residential yard drains.
PVC Pipe
Polyvinyl chloride tubing delivers a rigid, impact-resistant shell that is almost glassy on the inside and seldom collects debris. Engineers reach for it when long service life matters, whether in home gutters or the trunk lines of an office complex. The material shrugs off water pressure that would crush bells and whistles; think sewer branches, sump outlets, or any place that pushes its luck. Installation crews sometimes grumble because the weight laughs at tight bends and the price tag steals the show, yet most owners admit they had it coming. A single mistake with cheaper options can scuttle the project; the expense feels earned by then.
Key Considerations
Cost Corrugated tubing rarely wins longevity awards, but you get a lot of black pipe for the money. Stretch budgets squeak into projects where the odds of big pressure staying low seem decent.
Durability PVC refuses to bow under frozen soils, crushing trucks, or the slow creep of tree roots. Cracks hide quietly underground until excavation shows the damage-rarely a welcome surprise.
Ease of Installation The ribbed design bends in a hurry, hugging contours that would throw a straight stick into fits. Foremen appreciate that and spend less time estimating lateral offsets.
Maintenance Inside the white cylinder, water glides; inside the bellied pipe, it swirls and settles into ledges. Less sediment equals fewer callbacks and a happier project engineer.
Purpose shapes choice. For dynamic sites that require fast adjustments, engineers often reach for corrugated tubing. Structured, permanent installations lean toward PVC because it wraps reliability in a simple, glossy shell.
Soil texture, runoff load, project cost, and planned lifespan remain vital variables in any material ranking. Matching those figures against personal or client expectations typically yields the most straightforward route to an orderly, dependable drainage outcome.
DIY Tips: Digging a Trench for Your Drainage System
Excavating a trench for a drainage line is not merely a manual chore; it is a deliberate act of civil foresight. Authors in contemporary site-engineering literature stress that careful preparation significantly ups the odds of long-term system reliability.
Pick a route along the low points where stormwater lingers after rain, then string stakes or snap a chalk line so tomorrow’s crew will follow your intent. A fall of roughly 1 inch for every 8 horizontal feet remains the baseline rule taught in watershed-management courses.
Dial 811-and do it before the blade kisses the turf. This single phone call lets utility locators warn you about buried gas, cable television, and potable-water lines lurking beneath ordinary sod.
A sharp trenching shovel or heavy spade will usually clear the average back yard by lunchtime, though rented power trowels shave hours off larger cuts. Opt for muscle when the trench is narrow and shallow, but concede to hydraulics the day the trench widens past the shoulder.
Excavate the Trench
Strip away the topsoil and stockpile it for later use. Dig a trench 12 to 18 inches deep for a typical drainage run, or go deeper if the project must handle larger volumes of water. Check that the floor of the ditch holds a uniform slope so that standing water does not collect in low spots.
Add a Layer of Gravel
Dump 2 to 3 inches of clean gravel into the base. This layer speeds drainage and supports the pipe, especially where clay soils tend to hold moisture.
Install the Drain Pipe
Set the perforated pipe into the trench with its holes facing downward. Align the run to match the established slope.
Cover with More Gravel
Blanket the pipe with another few inches of gravel to encourage quick water movement toward the core of the system.
Backfill the Trench
Return the stockpiled topsoil to the trench, placing it in even lifts. Lightly tamp each lift to keep the surface from settling later.
Test the System
Pour water into the high end of the line and confirm that it travels freely to the outlet. Make any necessary tweaks before finishing the surface.
Digging a well-aligned trench and following up with a reliable drainage array often blocks water from creeping indoors. When cuts are measured twice and the fall is respected, a homeowner-made route may perform on par with a crew’s work. Before the first shovel touches earth, check municipal codes and think through how the scheme will reshape nearby land and habitat.
Why is a Drain Tile System Important for Agricultural Use?
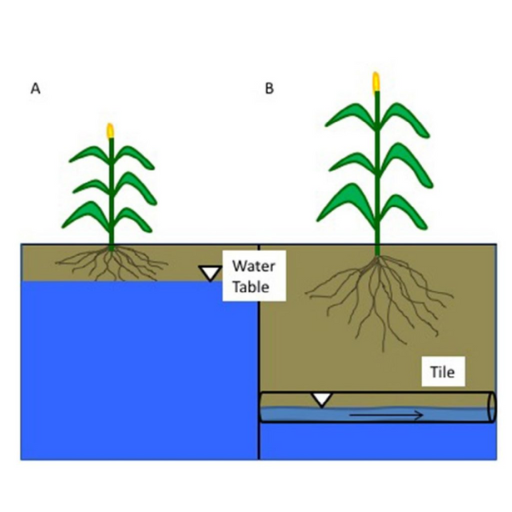
Farmers often install drain tile to relieve surplus water trapped in heavier soils. Quick removal of that water creates a healthier environment around crop roots, where flooded conditions otherwise sap oxygen and block nutrient movement. Tile placement also keeps wet paddocks from churning to mush underfoot, thereby preserving fragile topsoil. In hillside fields, the network slows the advance of deep, gully-forming flows. Reliable, buried lines therefore rank among the practical upgrades that sustain long-term farm profitability.
Boosting Crop Yield with Efficient Drainage
Well-functioning drainage remains one of the backbones of contemporary agriculture, often translating directly into larger harvests. Observations from the field indicate that farmers who install appropriately graded tiles can lift yields by upwards of 25 per cent on naturally wet land; the technology keeps the root zone neither flooded nor parched.
That same system also stabilizes the upper profile of the soil, helping nutrients, especially nitrogen and potassium, cling where plants can draw on them. Field trials reported in 2021 by specialists at the University of Illinois documented a 10-to-15-per-cent advantage in corn output on drained acres; the benefit proved most pronounced when spring and summer storms delivered more water than usual.
Today, hand-held GPS monitors and cloud-bound dashboards allow producers to track every inlet and outlet almost instantaneously. When such precision insight is paired with traditional drainage, water control becomes a dispatchable variable, not mere chance, and the result is visibly steadier crop growth. Sound drainage, therefore, sits at the intersection of profit, ecological stewardship, and the modern farmer’s growing appetite for data-driven methods.
Managing Soil Moisture and Excess Water
Managing moisture within farmland soils ranks among the oldest yet still most pressing challenges in sustainable agriculture. When water pools indefinitely, oxygen vanishes, roots suffocate, and precious nutrients wash downward well beyond the reach of growing plants. Trials conducted across several growing seasons show that farmers who hold moisture near a targeted sweet spot can boost crop performance by twenty percentage points, simply because roots stay both cool and hydrated without drowning.
Sat beside that historic apprenticeship, sleek technology now tags along in the form of soil moisture probes wired to automated delivery rigs. The sensors count the precise kilograms of water perched between soil grains and then advise growers whether a pump must hum to life or can remain silent for another day. Recent field reports affirm that such precision irrigation trims wasteful run-off by a stomach-dropping thirty to fifty percent, leaving both aquifers and the farm budget sighing with relief.
On a longer clock, farmers also reach for cover crops and barley-straw compost to rewire the very architecture of their soil. Fluffy aggregates sponge up rainfall while still routing excess water to hidden channels, thus softening the drama of both summer drought and flash flood. USDA measurements collected over multiple winters report that a well-timed rye cover can双 within three seasons double infiltration rates near the field edge, quietly choking off the rill gullies before they ever dare to form.
Careful oversight of soil moisture, accomplished through specialized sensors and time-honored conservation techniques, keeps fields green today and preserves their productive capacity for tomorrow.
Preventing Water Damage in Wetland Areas
Wetlands function, almost by instinct, as nature’s spare sponge, soaking up the water that would otherwise overwhelm rivers and streets. Engineers and ecologists alike now agree that a few straightforward resilience upgrades can turn that instinct into flood insurance. Rebuilding a mangled marsh, for instance, literally opens up more room for runoff; studies cited by the Ramsar Convention suggest that even a modest restoration can boost water-holding capacity by 30 percent, a number that translates directly into calmer neighborhood storm drains.
Alongside dirt-and-grass fixes, planners lean on zoning maps and satellite eyeballs to catch trouble early. NASA’s Soil Moisture Active-Passive mission, which tracks how wet the ground is from orbit, gives local officials precious extra hours to block roads or clear culverts before the clouds let loose. Tossing in native reeds or willow saves yet another round of busywork; the right plants lock the soil and shrug off torrential downpours because they already know the local weather by heart.
Community engagement is indispensable to any effort aimed at preserving wetlands. Informing residents about the ecological functions these areas perform, and then inviting them to participate in on-the-ground restoration tasks, helps ensure that protection lasts far beyond a single funding cycle. When local expertise is fused with contemporary monitoring tools, the result is a resilient safeguard against water damage and a dependable source of the myriad benefits wetlands deliver.
What Are the Common Problems with Drain Tile Systems?
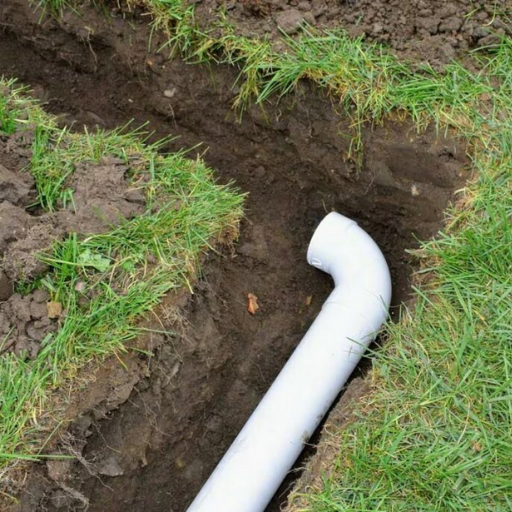
Drain-tile networks offer a reliable means of expelling excess groundwater, yet several recurring problems can undermine that reliability.
Clogging remains the most frequent complaint; silt, yard waste, or tree roots may pack the line and halt flow.
Physical fractures also appear, particularly after frost heaving or the passage of heavy equipment across an untreated trench.
Installation shortcuts, whether a slope set too flat or the omission of a gravel curtain, allow water to settle instead of draining outward.
Finally, the plastic or ceramic pipe itself can age long before its expected lifespan, developing hairline leaks that gradually worsen.
Carrying out scheduled digs and simple camera surveys lets contractors flag each of these troubles before a crisis.
Signs of Drain Tile Failure
Early signs of drain tile failure can be identified to prevent major water damage and expensive repairs. The following are some common indicators:
1. Water in the Basement – The most obvious sign of a failing drain tile system is water permeating through basement walls or pooling on the floor. Almost 85% of homes that have water damage issues result from poor drainage.
2. Mold and Mildew Growth – Poor drainage creates high moisture levels, which cause mold and mildew to breed. According to the CDC, exposure to molds has adverse health effects, especially for people with asthma or allergies.
3. Efflorescence on Walls – A white powdery substance on the basement walls indicates moisture evaporation due to cracks or bad drain tiles.
4. Foundation Cracks – Poor drainage leads to hydrostatic pressure which results in foundation cracks. Studies reveal that more than 65% of foundation problems occur due to poor water management.
5. Persistent Musty Odor – Even when there isn’t any visible water, another symptom of a failing drain tile is a damp and musty smell in the basement.
The drain tile system may be blocked or fail to direct water properly if the sump pump runs nonstop or struggles during rainfall.
These signs need to be addressed immediately to prevent further damage. A yearly inspection of the drain tile system and its proactive maintenance can help avoid systemic failures. Research findings reveal that early detection and intervention can reduce repair costs by 40% compared to waiting until severe damage occurs.
How to Perform Drain Tile Repair
Repairing a drain-tile system is not just a maintenance chore; it is often the last line of defense against expensive water damage. Following a well-ordered procedure makes success far more likely.
Locate the Defect First
A leak stays hidden until floor puddles or a hairline crack appear on the foundation wall. Expanding damp spots in the basement and odor-thick air give a later alarm bells. Pushing a flexible camera cable through the pipe cuts guesswork, letting the contractor see clumps or breaks pin-sharp on a tablet screen.
Excavate with Care
Backhoes and shovel blades must shave away only enough soil to expose the tubing, so time is spent measuring and marking. The cut needs to reach the footing level, which is where most systems sit, not where memory says the grade once was. Unseasonably wet dirt is heaped aside with plastic sheeting so it can be replaced without bringing in new clay.
Clean Pipes or Set New Sections
Heavy-root mats or months of silt buildup yield to a hydraulic jet in one minute and a stiff brush in the next. A spider-web crack, however, forces replacement. Bell-and-spigot collars are set in liberal rings of gravel and silicon sealant, assuring water will no longer park inside tomorrow morning.
Test the System
Before the trench is backfilled, introduce a measured stream of water into the tile run. The liquid should travel unimpeded toward its intended egress, whether that is a sump basin or a municipal catch basin. Take the opportunity to correct any hydraulic defects that reveal themselves during this simple flow check.
Backfill with Gravel and Soil
When the plumbing performs satisfactorily, enclose the lines in clean, washed gravel. This layer promotes drainage and protects the pipe from crushing under future loads. A thin cap of topsoil follows, compacted gently to avoid later settlement that could pinch the drainage network.
Install Additional Preventive Measures
In locales prone to torrential downpours, a waterproof membrane on the foundation wall can serve as a first-line shield. Equally effective, though more labor-intensive, is re-grading the yard to coax surface runoff away from the building footprint. For added peace of mind, an electrically powered sump pump can expedite any lingering water to a safer discharge point.
Cost and Time Considerations
Current project surveys place professional drain-tile repair in the $1,500 to $8,000 bracket; severe, widespread failure naturally inflates that figure. Homeowners willing to shoulder the labor can trim expenses, provided they own suitable equipment and understand the gravity of proper installation. A typical job spans 2 to 5 calendar days, though unexpectedly saturated soils or damaged mains may extend that timetable.
Routine preventive maintenance often proves less expensive than waiting for a major repair to surface. Periodic inspection paired with conscientious gutter routing can help keep a drain-tile network functioning smoothly for twenty years or more.
Preventative Measures to Keep Drainage Systems Functioning
Proactive care is the lifeblood of any drainage system; leave it unattended and problems compound quickly. A system that works as intended keeps basements dry and spares homeowners the shock of sudden repair bills.
Routine Inspections
Take the time to walk the system at least twice a year- spring and fall are natural intervals. A glance at standing water, cracked pipes, or rusted joints reveals more than a to-do list; it reveals the difference between a small fix and a catastrophic failure. HomeAdvisor notes that catching minor faults early can chop final repair invoices by as much as half.
Gutters and Downspouts
Love them or ignore them, gutters and downspouts dictate where roof runoff lands. Leaves and twigs form brick-like plugs that spill water over the edge and, sooner or later, under the slab. The EPA advises clearing that channel every three or four months, a habit made easier by the aftermarket gutter guards that screen out all but the finest debris.
Proper Grading Around the Property
The land surrounding a house should drop at least six inches within the first ten feet out from the foundation. That simple slope encourages rainwater to move away on its own rather than pool next to the walls. Research cited by the American Society of Home Inspectors now attributes more than sixty percent of basement moisture problems to lots graded the wrong way.
Install and Maintain Sump Pumps
A sump pump sits low in the basement, quietly pushing excess water away from the footings before any damage can begin. Experts recommend testing the unit every three to six months, because emergencies rarely arrive at convenient times. For the rare, costly moment when the power fails, a battery backup system turns from optional to essential.
Use Drain Snakes or Hydro-Jetting
A simple drain snake can often free minor clogs lodged in kitchen lines or bathroom vents. When grease or roots build up further down, however, professional hydro-jetting blasts high-pressure water through the entire length of the pipe. Industry statistics shared by Angi suggest that regular hydro-jetting cuts the risk of serious blockages by seventy percent.
Steer Clear of Drainage Corridors
Tree roots, once established, possess a remarkable tenacity and will eventually invade any underground pipe that stands in their path. Giving new plantings a cushion of at least twenty feet from the roof drain and foundation drain paths sharply cuts that risk. A utility map obtained from the local public works office can pinpoint where those lines run, turning guesswork into sound judgment.
Keep an Eye on Water Spending
Pouring on extra water during an already sod-laden week can drown the very pipes that carry storm runoff away from the house. Collecting roof runoff in a rain barrel not only protects the landscape, it lightens the load on the municipal system when skies open up for the third time that month. Patch any dripping faucets and time irrigation carefully; even small leaks add up and strain buried channels that were never meant to carry a steady stream.
Homeowners who blend such habits with a camera-aided inspection of drain tiles every few years often discover that those lines last through one wet season after another. Routine cleaning, paired with a posture of prevention rather than rescue, converts an unpredictable nuisance into a manageable chore. When summer thunderstorms roll in, the sense of calm that comes from knowing the system is ready rarely has a concrete dollar value, yet it looms large in everyday peace of mind.
How to Maintain Your Drainage Tile?
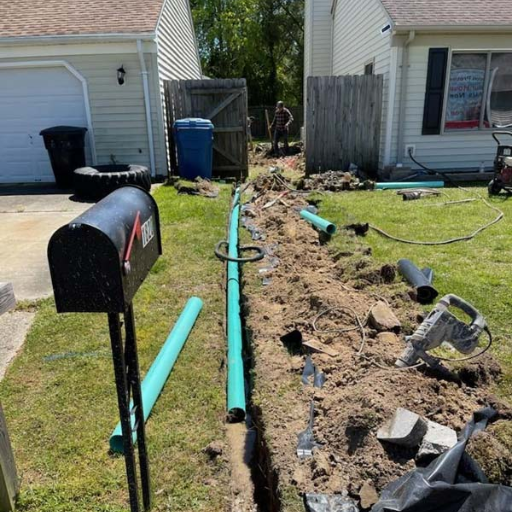
Drainage-tile maintenance does not lend itself to improvisation, so methodical attention pays dividends over the long haul. Regular inspections represent the first line of defense. Sluice outlets, pipe collars, and the intakes themselves should be visually vetted for rubble, erosion scars, or visible deformation. Clear those entry points of leaves and silt before blockages can form. A fast water flush, heavy enough to scour loose grit, keeps the inner conduit from becoming a slow drain in its own right. Cracks that appear in the tile body or at joint seams should be repaired the moment they are noticed; any delay invites larger breaks and a bigger repair bill. Grading around the tile must slope away from structures so standing water does not menace foundations. Finally, bringing in a qualified contractor once a year, or once every other year at minimum, allows specialized cameras and experience to spot issues an untrained eye can miss. Routine upkeep protects the system, and that protection usually stretches lifespan well beyond initial expectations.
Regular Inspection and Maintenance Tips
Inspection for Cracks or Damage
Visibly inspect the drainage tiles, connections and joints for cracks or damage. Tiny cracks often grow, leading to system inefficiency or even leaking.
Clear Debris
Periodically clean out such debris as leaves, soil or other sediments that could block the drainage tiles. Any kind of blockage greatly reduces water flow and can result in failure of the system.
Check Water Flow
To be sure there are no obstructions or sagging pipes, run water through the system to see if it flows smoothly to the outlet. If the flow is slow or uneven, it may indicate some blockages.
Monitor Soil Conditions
Look at the soils and ground around your drainage tile to see if there is any sign of excessive moisture and erosion which are indicators of leaks or non-functional tile systems.
Check Exit Points
Ensure there are no blockages, in addition to checking that water is flowing well in these exit points where water leaves the system. If outlets are blocked, they cause a backup, resulting in water accumulating near the foundation.
Dealing with Clogged Pipes and Perforated Pipe Issues
Clogged pipes and malfunctioning perforated pipes can lead to serious drainage problems, including water pooling near the foundation and soil instability. Combining regular maintenance practices with strategic interventions is however, is crucial enough to address these challenges. The following are essential steps and data-backed methods for dealing with these issues:
Identify the Cause of the Clog
Debris such as soils, plant roots and mineral deposits causes most of the drain clogs according to recent studies. Tools like pipe inspection cameras can be used to identify where exactly a clog is located and what type it is, thus saving time and money.
Clear Blockages with Hydro Jetting or Snaking
Hydro jetting which is a high-pressure water cleaning method, has proved to be highly effective in eliminating stubborn clogs as well as cleaning out perforated pipes according to industry trends. A plumbing snake, on the other hand, can help remove small obstructions. Both approaches need due care when being applied so that damage does not occur to older pipes.
Prevent Root Intrusion
Tree roots cause many perforated pipe problems in drainage systems, according to research. Risk factors could also be minimized by using root barriers or chemical root repellents in areas prone to intrusion. Regular inspections around trees and shrubs are also necessary for the prevention of long-term damage.
Replace Damaged Perforated Pipes
In cases where perforated pipes have become too damaged or corroded, it is often more cost-effective to replace them rather than try to repair them. It is advisable to install HDPE (High-Density Polyethylene) pipes due to their enhanced durability and ability to withstand environmental pressures compared with conventional materials.
Consider Using Drainage Additives
The use of enzymatic or bacterial additives can help in the breakdown of organic matter. These modern products demonstrate high efficacy when used as part of a regular maintenance program.
Key Statistics and Insights
According to the Plumbing Best Practices Report 2023, about 80% of clogged pipe problems are caused by debris and sediment buildup.
Systems that use older clay pipes are five times more likely to be affected by root intrusion than those made from newer PVC or HDPE materials.
Due to its 95% success rate in unblocking, hydro jetting remains a preferred option for stubborn clogs.
One way through which this can be achieved is by adopting such strategies and keeping up with the latest developments in drainage technologies. For systems that experience frequent problems, consulting a professional drainage specialist may be warranted.
The Importance of Grading and Surface Water Management
Landscapers and structural engineers alike know that getting the grade right is not an afterthought- quite the opposite. When surface water is properly routed, roofs, windows, and basement walls stand a fighting chance against the relentless push of rain. Mess it up, however, and soil washes away, puddles linger for days, and the very backbone of a building can begin to crumble. One recent survey, published in 2023, traces nearly 40 percent of U.S. residential insurance claims to bad grading.
Slope is the language of drainage. A fall of roughly six inches for every ten feet-steady, not stair-stepped-tilts runoff toward the yard instead of toward the front door. Add a lined swale, a buried French drain, or even a small rain garden, and excess water no longer has to pick its path; it is caught, conducted, and stored or discharged with minimal fuss. Those combinations turn a haphazard downpour into an orderly procession.
Urban centers, squeezed for space, are flirting with greener alternatives such as permeable pavement and biofiltration strips. Tests show that these surfaces soak up close to 70 percent of the initial storm surge, which in turn keeps city pipes breathing during violent storms. For the homeowner who wants a hands-on edge, smart sensors that blink alerts to a cell phone now guide pumps and valves in real time. High-tech or low-tech, the goal is the same: keep water moving where it must, and let people stay dry.
Integrating sound grading methods with contemporary drainage technology allows residents to safeguard their land and still mind the water beneath their feet. Good design of that sort curbs the toxic surge of runoff, guards the house’s pocketbook from surprise repairs, and nudges the whole neighborhood toward a kinder brand of stormwater stewardship.
Reference Sources
- Tile Drainage-North Dakota State University
Presents a straightforward account of how buried tile lines work and why many North Dakota farmers rely on them. It connects the science to day-to-day field conditions. - Basic of Agricultural Tile Drainage- University of Wisconsin Extension
Details the core principles, common pipe materials, and installation gear that contractors and agronomists choose when setting up a new grid under cropland. - Maintaining Tile Drainage Systems- University of Wisconsin Extension
Walks through the routine checks and minor repairs that keep a tile system functioning, from spring inspections to outfall clearing.
Frequently Asked Questions (FAQs)
Q: What is a drain tile system and why is it important?
A: A drain tile system is a type of drainage system used to remove excess water from soil, particularly in agricultural settings. It is important because it helps prevent waterlogging, thus protecting crops and improving crop yield. Additionally, it helps in keeping water away from your home, preventing water damage and maintaining a dry basement.
Q: How does a drain tile work?
A: A drain tile system works by using perforated pipes installed underground to collect and redirect excess water away from an area. The pipes are typically laid in a trench filled with gravel, which allows water to seep into the pipes and be carried away, preventing soil saturation and water accumulation.
Q: What materials are used in drain tile installation?
A: Drain tiles are commonly made from PVC or corrugated pipe. These materials are chosen for their durability and effectiveness in directing water. The pipes are perforated to allow water to enter and are typically installed in a trench filled with gravel to improve drainage.
Q: Can I perform a drain tile installation as a DIY project?
A: While it is possible to install a drain tile system as a DIY project, it requires careful planning and execution. You need to dig the trench, lay the perforated pipe, and ensure proper grading to direct water away efficiently. However, for complex installations or if you lack experience, hiring a professional contractor is recommended.
Q: How do I maintain a drain tile system?
A: Regular maintenance of a drain tile system includes checking for blockages in the pipes, ensuring the sump pump is functioning if applicable, and inspecting for any signs of damage or wear. Keeping the area around the perimeter of your home clear of debris will also help maintain effective drainage.
Q: What are the signs that my drain tile system needs repair?
A: Signs that your drain tile system may need repair include persistent wet spots in your yard, water accumulation along the foundation, or a basement that is not staying dry. If you notice these issues, it may be time to inspect your drainage system for potential blockages or pipe damage.
Q: How does a drain tile system benefit agricultural practices?
A: In agricultural settings, a drain tile system helps manage soil moisture, preventing waterlogging and improving soil conditions for crop growth. This subsurface drainage is crucial for enhancing crop yield and ensuring that excess water is efficiently removed from fields, especially in areas with heavy rainfall or clay soil.
Q: What is the difference between exterior and interior drain tile systems?
A: Exterior drain tile systems are installed around the perimeter of a building or field to prevent water from entering the structure or accumulating on the surface. Interior drain tile systems are installed inside a building, typically around the basement foundation, to manage groundwater and keep the basement dry.
Q: Do I need a permit for drain tile installation?
A: The need for a permit for drain tile installation varies by location and the scope of the work. It’s important to check with your local building authority to understand any regulations or permits required for installing a drainage system on your property.
Q: How can a drain tile system protect your home from water damage?
A: A drain tile system channels excess water away from the foundation and basement of your home. This helps prevent water intrusion, which can cause structural damage, mold growth, and other issues related to moisture. By keeping your basement dry and directing water runoff away, a drain tile system plays a crucial role in protecting your home from water damage.


